What is an RSS Feed?
RSS (Really Simple Syndication) feeds are a standardized way for websites to share their latest content—like blog posts, news articles, or podcasts—in a structured format that’s easy for computers to read. An RSS feed is essentially a text file written in XML that contains a list of a website’s most recent updates.
When someone subscribes to an RSS feed using a feed reader (also called an aggregator), they can automatically receive updates in one place—without having to visit each website individually.
For businesses and platforms like Hushly, RSS feeds allow for automated content syncing, turning blog posts into usable assets without manual copying or pasting.
How does Hushly work with RSS Feeds?
If you already have a blog and want to turn your articles into Hushly Assets, doing so manually, one-by-one, can be time-consuming. With Hushly, RSS Feeds are imported and your blog articles are created in one step—saving time and effort.
Follow the steps below to create RSS Feeds:
- From the Left Nav Menu, click Assets.

- On the Assets page, click RSS Feeds.

- On the RSS Feeds page, click Add RSS Feed.

- The Add RSS Feed page is displayed.

- Enter the details on the Add RSS Feed page.
- Enter the RSS Feed Name.

- Enter or Paste the RSS Feed URL.

- Select the Asset Type from the drop-down list.
 Note: Asset Type fields are defined under Setup > Asset Types.
 - Select the Sync Category Field from the drop-down list.
When selected, Hushly automatically maps and assigns category values from RSS feed entries to the chosen Catalog field in Hushly.
Example: If a Catalog Field in Hushly has three predefined values and the Sync Category Field is mapped to it, Hushly will automatically assign new category values from the RSS feed entries to this field. As a result, the Catalog field may now include a new (fourth) value based on the feed.
- Note: Sync Category Fields are defined under Setup>Field Management.
- Edit the Catalog field and arrange the values in alphabetical order under Setup>Field Management.
- Enter the RSS Feed Name.
- Remove Asset with Feed Entry: Toggle this option to Yes to automatically remove the asset from Hushly when it is removed from the RSS feed. If left off, the asset will remain in Hushly even after it's removed from the feed.

- Download Thumbnail Image: If your blog's images are restricted to your domain and not accessible externally, you can use this option to ensure your thumbnail image displays correctly on Hushly.
When enabled, this feature downloads and copies the thumbnail image to Hushly's servers, allowing it to be served directly from Hushly. This is especially useful if your original image URLs are blocked by CORS policies, firewalls, or authentication.

- Folder: The default location for the RSS Feed is the Uncategorized/Asset folder. Click on Choose to designate a different folder of your choice for placement.

- Click Save.

- The RSS Feed Edit Page is displayed with the Configure (by default) and Automation tabs, as well as Activate and Delete buttons.
- Configure Tab: Prepopulates the fields and values updated during the creation of RSS Feeds.
- Automation Tab: Enables automatic assignment of Catalog field values based on the contents of RSS feed entries. This streamlines asset classification during RSS imports, reduces manual effort, and ensures greater consistency.
- Activate: Clicking the Activate button begins the process of syncing RSS Feeds into Hushly. If you want to include Catalog field values during the sync, make sure to create an Automation rule first.
Note: If you click Activate without setting up automation rules, the assets will sync into Hushly, but the Catalog fields' value will not be populated. - Delete: Clicking on the Delete button will delete the RSS Feed and the Assets with a confirmation message.

- Click the Automation tab. The Automation details page is displayed with Activate, Delete, and Add Rule buttons. Click Add Rule.

- The Add Automation Rule pop-up is displayed.

- Enter a Name for the automation rule. The Enabled toggle is set to Yes by default.

- In the rule section, click the drop-down list to select the RSS Feed Item by Title, URL, Author Name, Author Id, Categories, and Content.

- Select an operator from the drop-down.

- Add the value for the rule. The Title value entered should match the Title in the Feed.
 Note: You can add additional filters to the rule by clicking the Add Filter link.
 - In the Perform These Actions, click the Add new Action link.

- A drop-down menu opens with Set Catalog Field Value and Skip Import. Click Set Catalog Field Value.

- Select a Catalog field.

- Select the Value for the chosen Catalog Field.
 Note: You can add more Actions by clicking the "Add new Action" link.
 - Click Skip Import from the drop-down menu.
Selecting Skip Import ensures that any feed items matching the defined rules or filters are excluded from import. These items will be excluded during the sync process.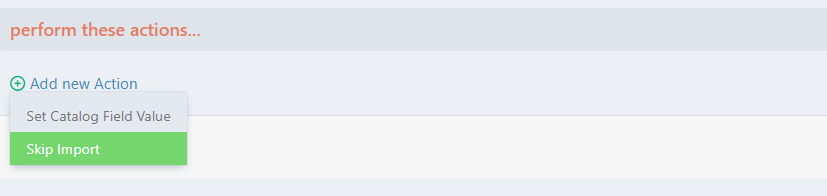
The Skip Import action message is displayed. Click Save.

- The rule is saved and displayed in the Automation Rules listing page. Click Activate to initiate the feed synchronization.

- A confirmation dialog appears with Ok and Cancel options. Click Ok to activate the feed, and a confirmation message will be displayed. The Activate button is replaced by Sync and Pause buttons after activation.
 Note: Clicking RSS Feed in the breadcrumb navigates to the RSS Feed listing page.
- Enter a Name for the automation rule. The Enabled toggle is set to Yes by default.
- The RSS Feed is synced and displayed with the number of Entries.

- Once the RSS Feed is successfully synced, click on the number link under the Number of Entries column, which will lead to the Assets that were created using the RSS Feed.

- The Assets are filtered and displayed on the Assets page.

Automating Synced Assets to a Blog Stream
To ensure all synced blogs appear automatically in your Blog Stream, follow these steps:
- Go to Hubs > select your hub > click Streams from the hub menu to create a new Blog stream.
- Create an Automation Rule and link it to the stream.
Once your blogs are synced into Hushly, they will automatically populate in the associated Blog Stream. To know more about Automating the Addition of Assets to a Stream, click here.
Viewing the Assets created by the RSS Feed:
To view the Assets created by the RSS Feed, you can follow the steps below:
- On the Assets page, click the drop-down arrow from the Search field.

- Select the RSS Feed name from the RSS Feed list and click Search.

- The Assets created by the RSS Feed are displayed. Click the Asset you would like to view.

- By default, the Metrics tab opens. This tab provides information about the performance of the Asset.

- Click the Setup tab. This tab provides setup information on the Asset that was created by RSS Feed.

- Metadata Section: Name, Title, Excerpt, Description, Folder, Type, Language, Fulfillment URL, and Time.

- Options Section: Ungated, Opt-in Message, Hidden, and Email Template.
For RSS Feeds, the Ungated button is set to Yes by default and cannot be toggled to No.
- Thumbnails Section: Thumbnail 1 and Thumbnail 2. Thumbnail 1 is created if there is an image tag in the Feed, either in the Content or Description section. Thumbnail 2 is not created automatically.

- Catalog Section: The values will be added to the Catalog fields automatically.

Note: Catalog Fields need to be created and defined under Setup > Field Management > Asset Fields.
- SEO Section: SEO Title, Canonical URL, and SEO Description. The article's page URL is used as the Canonical URL.

- Custom Fields Section: If you define Custom Fields using Setup > Field Management, the fields for the Asset are seen in this section.

- Metadata Section: Name, Title, Excerpt, Description, Folder, Type, Language, Fulfillment URL, and Time.
- Click the Content tab to view the content of the item in the RSS Feed.

Related Topics:
Was this article helpful?
That’s Great!
Thank you for your feedback
Sorry! We couldn't be helpful
Thank you for your feedback
Feedback sent
We appreciate your effort and will try to fix the article