You can personalize your pages in PageSherpa in two ways:
Using the PageSherpa Extension, or through the Personalized Pages tab in the left navigation menu of the application.
To personalize pages within the application, navigate to the Personalize Pages tab and click Personalize Landing Page. From here, you can begin customizing your webpage content and layout, updating elements, tailoring messaging for target accounts, and applying personalized variations, all directly within the PageSherpa interface.
To personalize a webpage using the PageSherpa application, follow the complete workflow below from launching the personalization interface to publishing your personalized variation:
- Launch the Application
- Element Selection and Saving the Variation
- Add or Copy Existing Segment
- Adding Target Accounts and Personalization
- Understanding Credit Usage During Personalization
- Personalizing with AI Instructions
- Previewing and Publishing the Variation
Launch the Application
- From the Left Nav Menu > click Personalized Pages.

- The Personalized Pages screen is displayed, featuring a Personalize Landing Page button. Click Personalize Landing Page.

- The Personalize a Landing Page pop-up appears, prompting you to enter the page URL you want to personalize. As soon as you begin typing the URL, the Start Personalizing button becomes active. Click Start Personalizing.

- The website opens in a new tab, displaying the Visual Editor at the bottom of the page, with the Select Element button, the Selection Mode Active toggle (on), and an Element Selector preview image.

Element Selection and Saving the Variation
- Hover over the element with your mouse and click to select it. The selected elements are then displayed in the Selected Elements section of the Visual Editor.

- In the right-hand panel, enter a Variation Name and click Next.

- The Create Segment page is displayed with Add Target Accounts Manually and Copy from Existing Segments.

Add or Copy Existing Segment
In the Create Segment section, under Choose Target Account Source, you can select either Add Target Accounts Manually or Copy from Existing Segment. If this is your first time using PageSherpa, select Add Target Accounts Manually, as no existing segments will be available yet.
- Enter a Segment Name and an optional Description, then click Next to continue.

- If you have existing variations, selecting Copy from Existing Segment allows you to choose from the segments you have previously created.

Adding Target Accounts and Personalization
- The Personalize section is displayed with the Personalize tab selected, and the Publish, AI Instructions, and Add Target Accounts buttons are visible. Click the Add Target Accounts.

- The Add Target Accounts pop-up window is displayed, showing the fields Account Name, Domain, and Description in the Create New Target Account section on the right-hand side. Along with these fields, the Create & Select Account and Add & Personalize buttons are disabled.

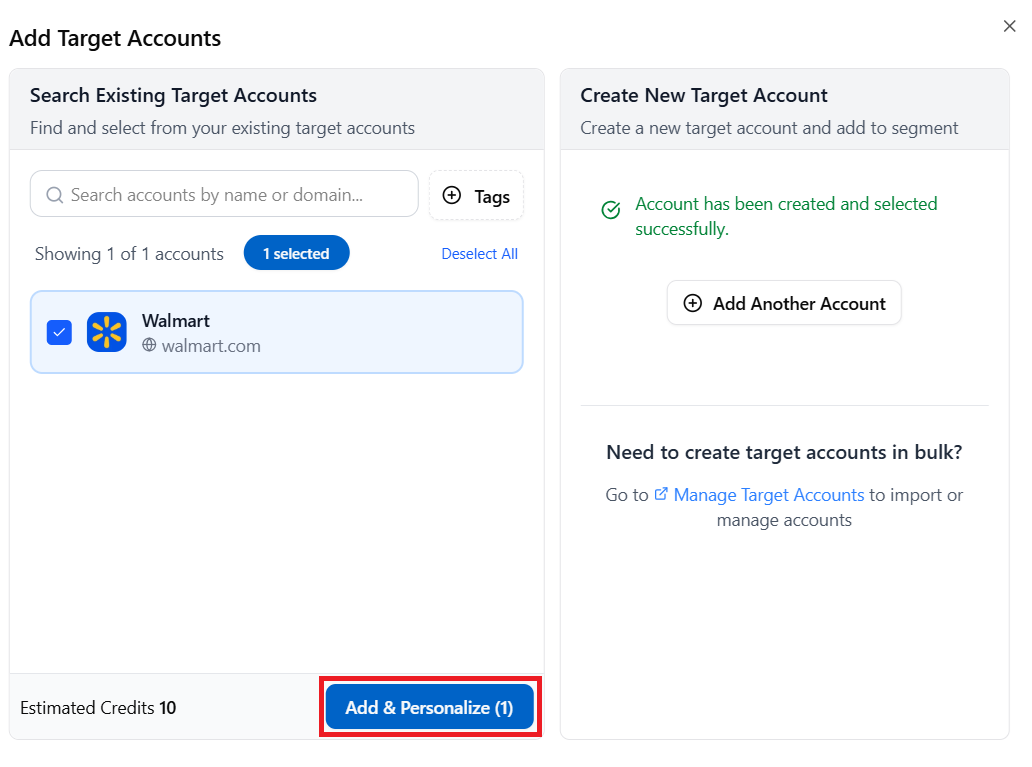
- Enter an Account Name. When you begin typing the company name in the Account Name field, a prepopulated list of matching companies appears, and the Create & Select Account button becomes enabled. Select the desired Account from the list, and the domain will be automatically populated. Optionally, enter a description, and then click Create & Select Account.

- The newly created account now appears in the left panel of the Add Target Accounts pop-up and is preselected by default. The Add & Personalize button displays the number of accounts selected, along with the estimated credits that will be deducted from the total available credits. Click Add & Personalize to proceed.
- The added account is displayed, showing both the personalized elements and the actual elements. Click the element to view the page updated with the personalized content.
 You can personalize the elements in three ways:
- Clicking the Personalize icon in a row personalizes all elements in that row.
- Clicking the Personalize icon in a column personalizes all elements in the selected column.
- Clicking the Personalize icon for an individual element personalizes only that element.

Understanding Credit Usage During Personalization
This section explains how credits are calculated and deducted when you personalize elements using Target Accounts and AI Instructions. Credits are consumed based on the number of Target Accounts added, the number of elements personalized, and the level at which personalization is applied (element, row, or column). Understanding this credit usage helps you plan your personalization efficiently and avoid unexpected credit deductions.
To know more about credit usage, click here.
Personalizing with AI Instructions
Best Practice for Using AI Instructions:
Before adding Target Accounts, go to the AI Instructions, in the Target Account Insight Instructions and Content Personalization section, and add your desired prompt.
By saving your AI Instructions before adding Target Accounts, you can reduce the credits used.
- You can also personalize using AI Instructions. Click the AI Instructions button in the visual editor.

- The AI Instructions pop-up window opens with two buttons: Target Account Insights (selected by default) and Content Personalization.

- Target Account Insights:
- Go to the Target Account Insights section.
- Enter your prompt. You can refer to the example prompts in the drop-down for guidance.
- Once text is entered, the Save Instructions button becomes active.
- Click Save Instructions, and a Confirm Update pop-up will appear.
- The pop-up will show:
The credits required to generate personalized content
Two action options: Cancel or Continue
- Select Continue to proceed.
- The pop-up will close, and the system will generate personalized content based on your AI instructions.

- Content Personalization:
Go to the Personalization Instructions section.
Enter your prompt. You can refer to the example prompts in the drop-down for guidance.
Choose whether to apply the instructions:
To all elements, or
To a specific element
Once text is entered, the Save Instructions button becomes active.
Click Save Instructions, and a Confirm Update pop-up will appear.
The pop-up displays:
The number of credits required to generate the personalized content
Two action options: Cancel or Continue
Select Continue to proceed.
The pop-up will close, and personalized content will be generated based on your AI instructions (for all elements or the selected element).
 Note: You can also personalize Individual Elements by clicking the element.
- If you want to tweak a variation before publishing, double-click the element you want to edit. This opens a pop-up showing the selected element. If you’re not satisfied with the AI-generated variation, you can either select another option provided by AI or enter your own content. Click Save to apply the changes.

Previewing and Publishing the Variation
- To preview the variation before publishing, click on the eye icon for the Targeted Account.

- The Targeted Account page is displayed with the two tabs: AI Generated Insights and Personalized Elements, with the Preview URL and the Live URL links. In the Company Information section, the Company name and the Website are displayed alongside the list of Personalized Elements for the company. Click Preview URL.

- The preview page is displayed with the personalized variation.

- The preview page is displayed with the personalized variation.
- Click the Live URL link.

- If the variation is published, the live page will display the personalized content. If not, the unpublished version will be shown instead.
- If the variation is published, the live page will display the personalized content. If not, the unpublished version will be shown instead.
- The Targeted Account page is displayed with the two tabs: AI Generated Insights and Personalized Elements, with the Preview URL and the Live URL links. In the Company Information section, the Company name and the Website are displayed alongside the list of Personalized Elements for the company. Click Preview URL.
- Click the Publish button in the visual editor.

- The PageSherpa Tag Setup pop-up window appears, showing the Tag that needs to be inserted on your website, along with two options: Cancel and Next: Publish Variation buttons. Click Publish Variation.
Important: Before publishing the variation, ensure the tag is inserted on your website in the <head> section.
- The Review and Publish Variation section displays a summary of the variation, including the Variation Name, Segment Name, Page Title, Targeted Accounts number, and an Example Personalized URL. At the bottom, you will see two options: Back and Publish Variation. Click Publish Variation to proceed.

- A message “Variation Published Successfully!” is displayed, along with the number of Personalized URLs and Elements Personalized. You can copy the URLs directly from the Personalized URLs section or download them by clicking Download CSV. At the bottom of the window, click Close to finish.

- The PageSherpa Tag Setup pop-up window appears, showing the Tag that needs to be inserted on your website, along with two options: Cancel and Next: Publish Variation buttons. Click Publish Variation.
- You can view the published variation in the Personalized Pages. Click the Title of the page.

- The Personalized Page displays the Page Title, Edit, and Delete buttons. In the Variation section, the variation appears with a Published status. The Create Variation button is available if you wish to personalize additional elements on the page.

- The Personalized Page displays the Page Title, Edit, and Delete buttons. In the Variation section, the variation appears with a Published status. The Create Variation button is available if you wish to personalize additional elements on the page.
Related Topics:
Personalizing Pages using PageSherpa Extension
Was this article helpful?
That’s Great!
Thank you for your feedback
Sorry! We couldn't be helpful
Thank you for your feedback
Feedback sent
We appreciate your effort and will try to fix the article